How to organize a salon trolley for maximum efficiency? The answer begins with movement, not decoration. A well-arranged trolley should reduce reaching, searching, and unnecessary walking during every service. Sam Villa, a respected salon educator and professional hairstyling expert, often emphasizes the value of preparation: “Keep your tools organized, accessible, and ready to use.” That principle fits every busy salon floor.
Picture a trolley beside the styling chair. The top tray holds frequently used tools, such as combs, sectioning clips, brushes, and sanitized shears. Keep electrical tools on a lower shelf, with cords secured safely away from wheels and wet areas. Place clean towels in a closed compartment. Store products upright, grouped by function, so labels remain visible. Small containers can hold clips and pins, but avoid filling every space. Empty space improves visibility.
Check the trolley before each appointment. Remove used items immediately. Wipe surfaces between clients. Keep only the products needed for the current service nearby. This saves time and creates a calmer experience for both stylist and client. Small changes matter.
Still, perfect organization may be unrealistic during a busy day. A trolley can become crowded after one complicated color service. That moment deserves reflection. Which items were unnecessary? Which tool was difficult to reach? Review the setup at closing time, then adjust it for tomorrow. Efficiency is not a fixed arrangement. It is a practical habit, improved through observation, cleaning, and honest correction.
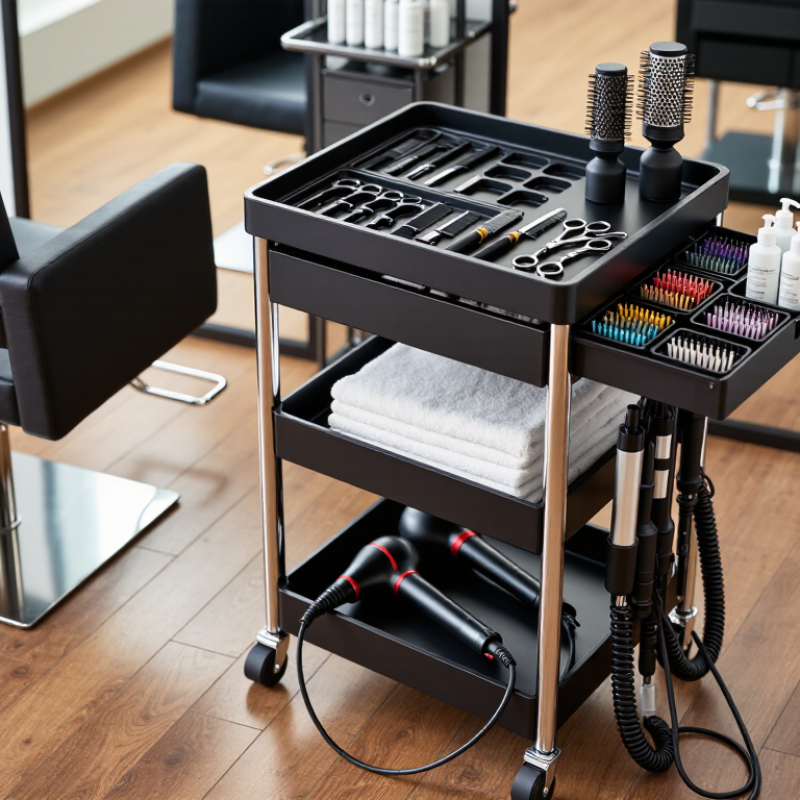
A salon trolley becomes efficient when each tool has a visible address. Use the 5S method to create clear trolley zones: Sort, Set in Order, Shine, Standardize, and Sustain. Keep cutting tools in the top tray, styling products in the middle, and cleaning supplies in a sealed lower section. Store frequently used items within one arm’s reach. Keep it visual. Labels can expose missing tools quickly.
During busy services, I have found that crowded trays encourage repeated searching and unnecessary movement. My early layouts failed because I organized products by category, not by task. A better system follows the service sequence. Place preparation items on the left, active tools in the center, and finishing products on the right. The U.S. Bureau of Labor Statistics recorded 2.6 million nonfatal workplace injuries and illnesses in 2023. A stable trolley layout cannot prevent every injury, but it can reduce avoidable reaching, bending, and clutter.
Shine means more than appearance. Wipe handles, inspect cords, and remove empty containers after every client. Standardize the setup with a small checklist. Sustain it by reviewing the trolley weekly. This is where habits often weaken. The UK Health and Safety Executive reported 1.7 million workers with work-related ill health in 2023/24, including musculoskeletal problems. That figure supports regular ergonomic checks, but salon conditions vary. Test the layout with real services, record awkward movements, and adjust one zone at a time.
A salon trolley works best when the 15–18-inch primary reach zone stays nearly empty of clutter. Place scissors, combs, clips, brushes, and disinfected tools there. These items should move from hand to hand without shoulder lifting or torso twisting. The Health and Safety Executive reported 543,000 workers with work-related musculoskeletal disorders in Great Britain during 2023/24. Small reaches can become expensive habits.
I tested this arrangement during a busy cutting session. My first layout looked organized, but the spray bottle sat too far back. I reached for it repeatedly. That was a mistake. Keep the spray bottle, sectioning clips, and most-used comb in the front tray. Store spare towels, extra guards, and sealed supplies below or on the side. The U.S. Bureau of Labor Statistics recorded musculoskeletal disorders in 27% of private-industry days-away-from-work cases in 2023. A trolley cannot remove every strain, but it can reduce unnecessary motion. Keep handles facing outward. Leave a clear space for used tools. Clean the reach zone between clients, not only at closing. Test the setup with your normal working hand. Then test it with the other hand. It may feel awkward at first. That awkwardness reveals weak placement. Review the trolley weekly, because your busiest service may expose a better arrangement.
How to Organize a Salon Trolley for Maximum Efficiency?
A well-organized salon trolley should separate clean, used, and disinfected items at all times. This simple layout supports OSHA hygiene controls and reduces cross-contamination risks. Place clean towels, combs, and sealed tools on the top shelf. Keep used items in a clearly marked, covered container below. Disinfected tools should remain separate until they are fully dry and ready for storage. Never return a used item to a clean tray, even for a few seconds.
Tips
Use color-coded containers or labels. Keep disinfectant solutions in closed, stable containers. Follow the product’s contact time and replace solutions as directed. Wipe trolley surfaces between clients, including handles and drawer edges. Keep only the tools needed for the current service. Too many items create confusion. They also make cleaning harder.
In daily work, small mistakes are easy to miss. A clean comb may touch a used towel, or a disinfected tool may be placed beside an untreated one. I have found that a three-zone trolley layout prevents these errors better than memory alone. Store waste separately, and remove it promptly when the container becomes full. Check the trolley before every appointment. If the system feels crowded, it probably needs revision. A short checklist can help, though it may seem unnecessary during a busy shift. Consistency matters more than speed.
| Trolley Zone | Item Category | Typical Examples | Storage Method | Handling Requirement | Status Control |
|---|---|---|---|---|---|
| Top tray: Clean supply area | Unused single-use items | Disposable neck strips, cotton pads, wooden applicators, gloves, foil sheets | Keep in closed, clean containers or original packaging; place above used items | Remove only the quantity needed for the current service; discard unused items if contaminated | CLEAN |
| Top tray: Clean tool area | Clean, ready-to-use tools | Combs, brushes, sectioning clips, shears, metal implements | Store dry in a clean, covered container separate from disinfected tools awaiting use | Handle with clean hands or gloves; do not place on an unclean countertop | CLEAN |
| Middle tray: Service-use area | Products and accessories in active use | Applicator brushes, mixing bowls, clips, towels, capes | Use a washable tray or liner that can be cleaned between clients | Keep product containers closed when not in use; prevent contact between clean tools and used materials | IN USE |
| Side holder: Sharps control | Sharps and sharp-edged disposables | Razors, blades, lancets, or other contaminated sharps where applicable | Place immediately into a closable, puncture-resistant, leak-resistant sharps container | Do not recap, bend, break, or manually remove contaminated needles; follow the applicable exposure-control plan | SHARPS |
| Bottom tray: Used-item area | Used reusable tools | Used combs, brushes, clips, shears, metal implements | Use a clearly labeled, covered, leak-resistant container; keep it physically separate from clean supplies | Do not return used tools to the clean area; transport them for cleaning and disinfection after the service | USED |
| Bottom or external hamper | Used linens and disposable materials | Used towels, capes, neck strips, cotton, and other service waste | Place linens in a closed laundry bag or hamper; place waste in a lined receptacle as required by local rules | Handle contaminated laundry as little as possible and wear appropriate gloves when exposure to blood or other potentially infectious materials is reasonably anticipated | USED |
| Separate clean storage container | Disinfected reusable tools | Tools that have completed cleaning, disinfection, rinsing, and drying | Store dry in a covered, labeled container; never mix with tools awaiting cleaning | Follow the disinfectant label for dilution, contact time, compatibility, and safe handling | DISINFECTED |
| External trolley pocket | Personal protective equipment | Disposable gloves, protective eyewear, face protection, and protective apron | Keep unused PPE clean, dry, and readily accessible; do not store it with used tools | Select PPE according to the expected exposure; remove contaminated PPE before leaving the work area | READY |
| Dedicated cleaning area | Cleaning and disinfection supplies | Detergent, labeled disinfectant, disposable towels, and a clean tool container | Keep chemicals in labeled containers and away from clean instruments and client products | Clean visible soil before disinfection; never mix chemical products; follow the product safety data sheet | CONTROLLED |
| End-of-service checklist | Turnover controls | Surface cleaning, tool segregation, waste removal, hand hygiene, and restocking | Use a written or digital checklist attached to the trolley or workstation | Clean and disinfect high-touch trolley surfaces between clients and restock only after the trolley is clean and dry | RESET |
A well-organized salon trolley should make safe work feel almost automatic. Keep disinfectants, cleaners, and other chemical containers upright, with caps tightly closed. Place them in a stable tray, away from heat, direct sunlight, and sharp tools. Never stack bottles loosely. One spill can turn a tidy station into a slippery hazard. Use clear labels and check that each container matches its original instructions.
The critical detail is EPA contact time. Read the label before preparing the trolley. Contact times may range from one to ten minutes, depending on the formulation and intended use. Apply enough solution to keep the surface visibly wet for the full stated time. Use a timer, not a guess. Removing the solution after thirty seconds may leave microorganisms insufficiently exposed. Never mix chemicals or dilute them unless the label specifically permits it. Ventilation and suitable protective equipment also matter.
I used to think a quick wipe looked efficient. It was not. Drying too soon can defeat the disinfection step, even when the trolley looks spotless. Now I place a small timer beside the clean tools and record any missed contact time. That extra pause feels inconvenient during a busy appointment. Still, consistent timing protects clients, staff, and the accuracy of the cleaning routine. Recheck the trolley between services.
Store chemical containers upright and keep disinfected tools visibly separated from used items. Always follow the EPA-registered product label for the required wet contact time; common label times may range from 1 to 10 minutes.
The chart shows three contact-time checkpoints: 1, 5, and 10 minutes. The surface must remain visibly wet for the full label-specified time.
An efficient salon trolley begins with a weekly stock audit, not a crowded top tray. Count every item, record opening quantities, and check expiry dates before replacing supplies. The 2023/24 HSE report estimated 543,000 workers experienced work-related musculoskeletal disorders in Great Britain, causing 7.8 million lost working days. Poor trolley handling can add unnecessary strain.
Keep frequently used tools between waist and shoulder height. Store heavier containers on the lowest shelf, with weight spread evenly across the frame. Never assume a trolley’s appearance proves its capacity. The manufacturer’s manual sets the safe limit, and each shelf may have a separate rating. NIOSH’s lifting equation uses a 51-pound load constant under ideal conditions, but that figure is not a trolley limit. Wheels, movement, posture, and uneven flooring change the risk.
Use a simple weekly sheet. Record actual weights, low-stock items, damaged packaging, and products nearing expiry. Set practical par levels for busy services, then adjust them after observing real usage.
A trolley overloaded with rarely used supplies looks prepared, but it slows movement and increases tipping risk. I once considered a full trolley efficient; that assumption needed challenging.
Leave clear space around scissors, brushes, towels, and electrical leads. Recheck the load after restocking, especially when several small bottles become one heavy group.
Use three clear zones: clean, used, and disinfected. Place clean towels, combs, and sealed tools on the top shelf. Keep used items in a covered, labeled container. Store disinfected tools separately until completely dry. Never mix them.
Treat the comb as used. Do not return it to the clean tray. Move it into the covered used-item container. This small mistake is easy to miss. Memory alone is unreliable.
Use colored containers or simple labels for each zone. For example, blue can identify clean supplies, while red marks used items. Choose a system staff can understand quickly. Keep waste in its own container. Clear labels prevent hesitation.
Keep every container upright, closed, and stable. Place bottles away from heat, sunlight, and sharp tools. Do not stack them loosely. A small spill can make the floor slippery. Check each label before use.
Follow the product label’s stated contact time. The required period may range from one to ten minutes. Keep the surface visibly wet throughout that time. Use a timer. Do not guess.
Early drying may interrupt the disinfection process. The trolley can look spotless while receiving insufficient contact time. A timer beside the clean tools creates a useful reminder. It feels inconvenient during busy appointments. Still, the pause matters.
Audit stock levels weekly. Record quantities, expiry dates, damaged packaging, and low supplies. Keep heavier containers on the lowest shelf. Spread weight evenly across the frame. Never assume appearance proves safe capacity.
Remove rarely used supplies and unnecessary duplicate items. Keep only tools needed for the current service. Leave space around scissors, brushes, towels, and electrical leads. A crowded trolley slows movement and complicates cleaning. My earlier idea of “fully prepared” was not always efficient.
How to organize a salon trolley for maximum efficiency? Start by dividing the trolley into clear zones based on the 5S workplace-organization method: sort unnecessary items, arrange essentials, maintain cleanliness, standardize placement, and sustain the system. Keep frequently used tools within the primary 15–18-inch reach zone so stylists can work smoothly without unnecessary movement. Less frequently used supplies can be placed in lower or secondary compartments, while heavier items should remain within the trolley’s manufacturer-recommended weight limits.
For safe hygiene control, separate clean, used, and disinfected tools in clearly defined areas to prevent cross-contamination. Store chemicals upright, secure their containers, and follow the product’s stated contact time, which may range from one to ten minutes. Finally, review stock levels weekly, remove expired or damaged supplies, and restock according to actual usage. A consistent organization routine improves workflow, supports sanitation, reduces clutter, and helps maintain a professional salon environment.
